IGM Pocket Hole: How to Create Hidden Screw Joints for Furniture Assembly and Repairs
Do you build furniture? Strong joints without visible screws take your work to the new level.
Visible screws are not acceptable in furniture. But how can you join parts when glue alone is sometimes not enough? The answer lies in hidden screw joints, which are strong, aesthetically pleasing, and – most importantly – quick and easy to make. Thanks to modern IGM Pocket Hole jigs for so-called pocket hole joints, their production takes just a moment. We will guide you on how to use the jig correctly so that the resulting joint is always perfectly strong and visually appealing.
Hidden screw joints, also known as pocket hole joints, do not require any special or expensive equipment or tools, unlike traditional dowels or Domino connectors. All you need is a standard cordless drill, a Pocket Hole jig for hidden screw joints, suitable
PockPocket Hole screws and a clamp to secure the jig to the workpiece. With this simple setup, you can create high-quality and elegant furniture joints both in a professional woodworking shop and in a small home workshop.
What Iis the IGM Pocket Hole Jig
The IGM Pocket Hole jig is designed for creating both inner and outer hidden pocket hole joints, which can be used for assembling and repairing of furniture or interior structures.
Jig features:
- Suitable for both inner and outer hidden joints
- Suitable for work with material up to 40 mm thick
- Compatible with both soft and hard wood
- Easy clamping with a built-in magnet and the IGM Pocket Hole Clamp
The IGM Pocket Hole jig consists of a hardened steel drill guide housed in a plastic casing. It is equipped with a magnet for easy attachment using the Pocket Hole Clamp and a sliding lug for adjusting of the drilling depth. It is available in two basic variants.
The IGM Pocket Hole Single is ideal for precise work with narrower planks or squared timbers. For working with wider boards, the IGM Pocket Hole Double, is more suitable, as it is equipped with two drill guides. This allows you to create a stronger double joint without the need to reposition the jig unnecessarily. Both variants are supplied as standard with a special 9,5 mm HSS drill, a Robertson No. 2 screwdriver bit, a depth stop, and 3 mm hex key.
The IGM Pocket Hole Double Starter Kit, is also available, which includes, in addition to the components mentioned above, 50 screws in five different sizes and a plastic storage case. This way, you will have almost everything you need for working with the jig at hand.
Using the Jig and Adjusting the Drilling Depth
The key to working with a pocket hole jig lies in properly setting the drilling depth. The hole must not be too shallow or too deep. In both cases, the joint loses its strength and could either come loose or crack. Additionally, if the hole is too deep, the tip of the screw may go through the workpiece, making the joint visible—something we want to avoid. So how do you use the jig to ensure a perfect result every time?
Choose an Outer or Inner Joint
The drilling jig is designed for making joints from both the outer visible side and the inner side, which is often useful for repairs or reinforcing existing joints. This distinction is important for adjusting the stop and setting the correct drilling depth.
For creating an outer joint, the lug must be turned downward so that it forms a stop at the end of the jig, which later supports the edge of the second workpiece to form the joint.
For drilling an inner joint (to repair or reinforce an already assembled piece), the lug should be turned upward so that the jig lies flat and makes full contact with the surface of the workpiece. This is useful if old joints have loosened or weakened over time.
Set the Drilling Depth and Join the Workpieces
The correct drilling depth is crucial for both the strength and aesthetics of the final joint, so it is important to pay close attention to this step. Below is a detailed guide to help you achieve perfect settings.
1. Measure the material thickness.
You can do this using a standard measuring tool or by using the scale on the back of the jig.
Attach the depth stop to the drill bit.
Turn the red adjustable stop lug on the jig downward so that its protruding part faces down. Place the drill bit into the recess of the stop on the black base of the jig.
3. Adjust the drill bit according to material thickness.
Align the drill bit so that the end of its wider section reaches the marking corresponding to the measured material thickness on the scale at the top of the black frame of the jig.
4. Secure the depth stop.
Attach the depth stop tightly to the drill bit shaft, positioning it against the adjustable stop. Tighten it using the provided hex key. The drill bit is now ready to use.
5. Find the correct scale for measuring the jig spacing.
Now, once again, adjust the red adjustable lug on the jig according to whether you are creating the outer or inner joint (as described above). On the sides of the jig, you can see two white scales, one for inner joints and the other for outer joints, which are slightly offset from each other. The adjustable stop has an arrow pointing to the scale corresponding to your selected joint type.
6. Set the jig spacing
Find the value on the appropriate side scale that is closest to the measured material thickness. Press the end of the sliding drilling sleeve to release the magnet, then move the sleeve so that the arrow at its end aligns the marking closest to your measured material thickness (see illustrations).
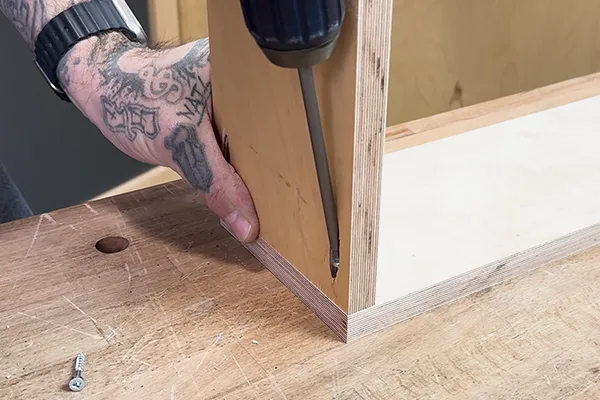
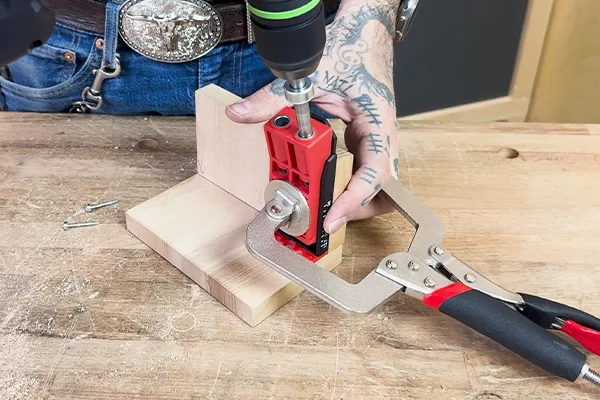
7. Fix the jig with a clamp and drill the holes.
The drilling depth is now set. Secure the jig to the stock using a pocket hole clamp or another quick-release clamp, then drill the pocket holes.
8. Insert the screws.
Replace the drill bit with a Robertson No. 2 bit and use the appropriate screws to fasten the drilled workpiece to the jointed part.
9. Done!
For even more elegant look, cover the pocket holes. You can glue in special wooden plugs for pocket hole joints or use common dowels, which you can then trim flush with the wood surface. Don’t forget to sand and, if necessary, paint or varnish the covers to blend them seamlessly with the material.
TIP:
If the joint is not under heavy stress or not highly visible, you can also use wood filler. You can easily make it yourself by mixing fine sawdust with Titebond Original, Premium, or Premium Dark glue in a 2:1 ratio (more sawdust than glue). Fill the holes with the mixture, let it dry, and then sand it smooth. If needed, apply paint or varnish. However, avoid using wood stain, as it does not adhere well to glue-based fillers, making the patched area more noticeable.
Pay Attention to the Selection of Pocket Hole Screws
Finally, let’s take a closer look at the screws, which are absolutely crucial for the strength of the joint. The length of the screw should be chosen based on the thickness of the material being joined. The table below will help you select the appropriate size.
| Material Tthickness (from – to) |
Screw Length |
Coarse-Thread Screws for Softwood (Code) |
Fine-Thread Screws for Hardwood (Code) |
| 12 - 16 mm |
25 mm |
LES-PHS25C |
LES-PHS25F |
| 17 - 20 mm |
32 mm |
LES-PHS32C |
LES-PHS32F |
| 21 - 26 mm |
38 mm |
LES-PHS38C |
|
| 27 - 34 mm |
50 mm |
LES-PHS50C |
|
| 35 - 40 mm |
63 mm |
LES-PHS63C |
|
Not only is the screw length important, but you also need to consider thread type based on the hardness of the wood. For hardwood (such as oak, maple, ash, or beech), choose fine-thread screws, which reduce the risk of splitting the wood. For softwood (such as spruce, birch, pine, or poplar), coarse-thread screws are preferable for a stronger grip.
For highly stressed joints, screws with a washer head are recommended, as they prevent the screw from embedding too deeply into the wood and provide a stronger connection. Conversely, countersunk screws are not suitable, as they can easily split the wood inside the drilled hole, potentially ruining the final product.
The Pocket Hole Clamp Makes Your Work Easier
When creating hidden joints, it is crucial to secure the jig firmly in place so it does not shift during drilling. The best tool for this is the original IGM Pocket Hole Clamp, which is easy to handle. It features large contact surfaces and an adjustable clamping screw, allowing it to adapt to the thickness of the material. This ensures that the jig stays securely in place while preventing damage to the wood.
If you don’t have clamping pliers at hand, you can use any quick-release clamps instead. However, be careful! The clamps should have wide enough jaws to avoid damaging the material’s surface. If you don’t have clamps available, you can even use ordinary or double-sided adhesive tape in an emergency.
No matter which securing method you choose, the IGM Pocket Hole jig will help you effortlessly achieve strong and aesthetically pleasing joints, elevating your woodworking skills to a new level. If you want to see the IGM Pocket Hole jig in action, check out the video below.
Back to what's new